Flashing an application onto the Icarus
nRF Connect SDK v3.2.x
There is a variety of methods to flash a binary onto the Icarus. This guide shows you how to flash a binary onto the Icarus through:
- Available binary files for nRF9160
- Flashing an application using J-Link and TagConnect
- Flashing an application using MCUBoot and USB
- Flashing an application using the Actinius I/O Serial Programmer
The Actinius Programmer that was available for use in nRF Connect for Desktop is now deprecated. Please use the Actinius I/O Serial Programmer instead.
Flashing through J-Link can be done in 2 different ways: directly from VS Code using the nRF Connect SDK extension, or with the West meta-tool. Flashing through Serial/USB and MCUBoot can be performed using the Actinius I/O Serial Programmer or the mcumgr utility.
Available binary files for nRF9160
There is a range of binary files that are generated when building an application with Zephyr and the nRF Connect SDK. The table below describes the most used binaries and their differences:
| filename | description |
|---|---|
zephyr.hex | The firmware application. This image is generally not used for nRF9160 development. |
merged.hex | The firmware application along with the bootloader(s) (there can be either one or multiple bootloaders in the image e.g. TF-M + MCUBoot). This image can be flashed to the nRF9160 using a J-Link programmer and West. |
zephyr.signed.bin | Signed binary of the firmware application for MCUBoot firmware updates, either FOTA or via cable (Serial / USB). Located at build/<app_name>/zephyr/zephyr.signed.bin. Can be flashed using the Actinius I/O Serial Programmer or the mcumgr utility. |
dfu_application.zip | A zip package containing the signed binary and a manifest. Located at the build root (build/dfu_application.zip). Can be used for DFU over serial or FOTA. |
With sysbuild (default in NCS v3.0+), merged.hex and dfu_application.zip are located at the build root (build/), while per-image outputs like zephyr.signed.bin are in build/<app_name>/zephyr/.
Flashing an application using J-Link and TagConnect
All the Icarus boards can be programmed using a Segger J-Link programmer. To flash an application onto the Icarus through this method you will need:
- A J-Link programmer. E.g. the on-board J-Link on the nRF5340 development kit
nrfutilwith thedevicesubcommand installed (nrfutil install device). Starting with NCS v3.0,west flashuses nrfutil as the default runner (replacing the deprecated nrfjprog).- In the case of the Icarus IoT Board v2 (i.e. Feather form-factor) a TC2030-CTX-NL TagConnect cable is needed to connect the J-Link programmer to the Icarus
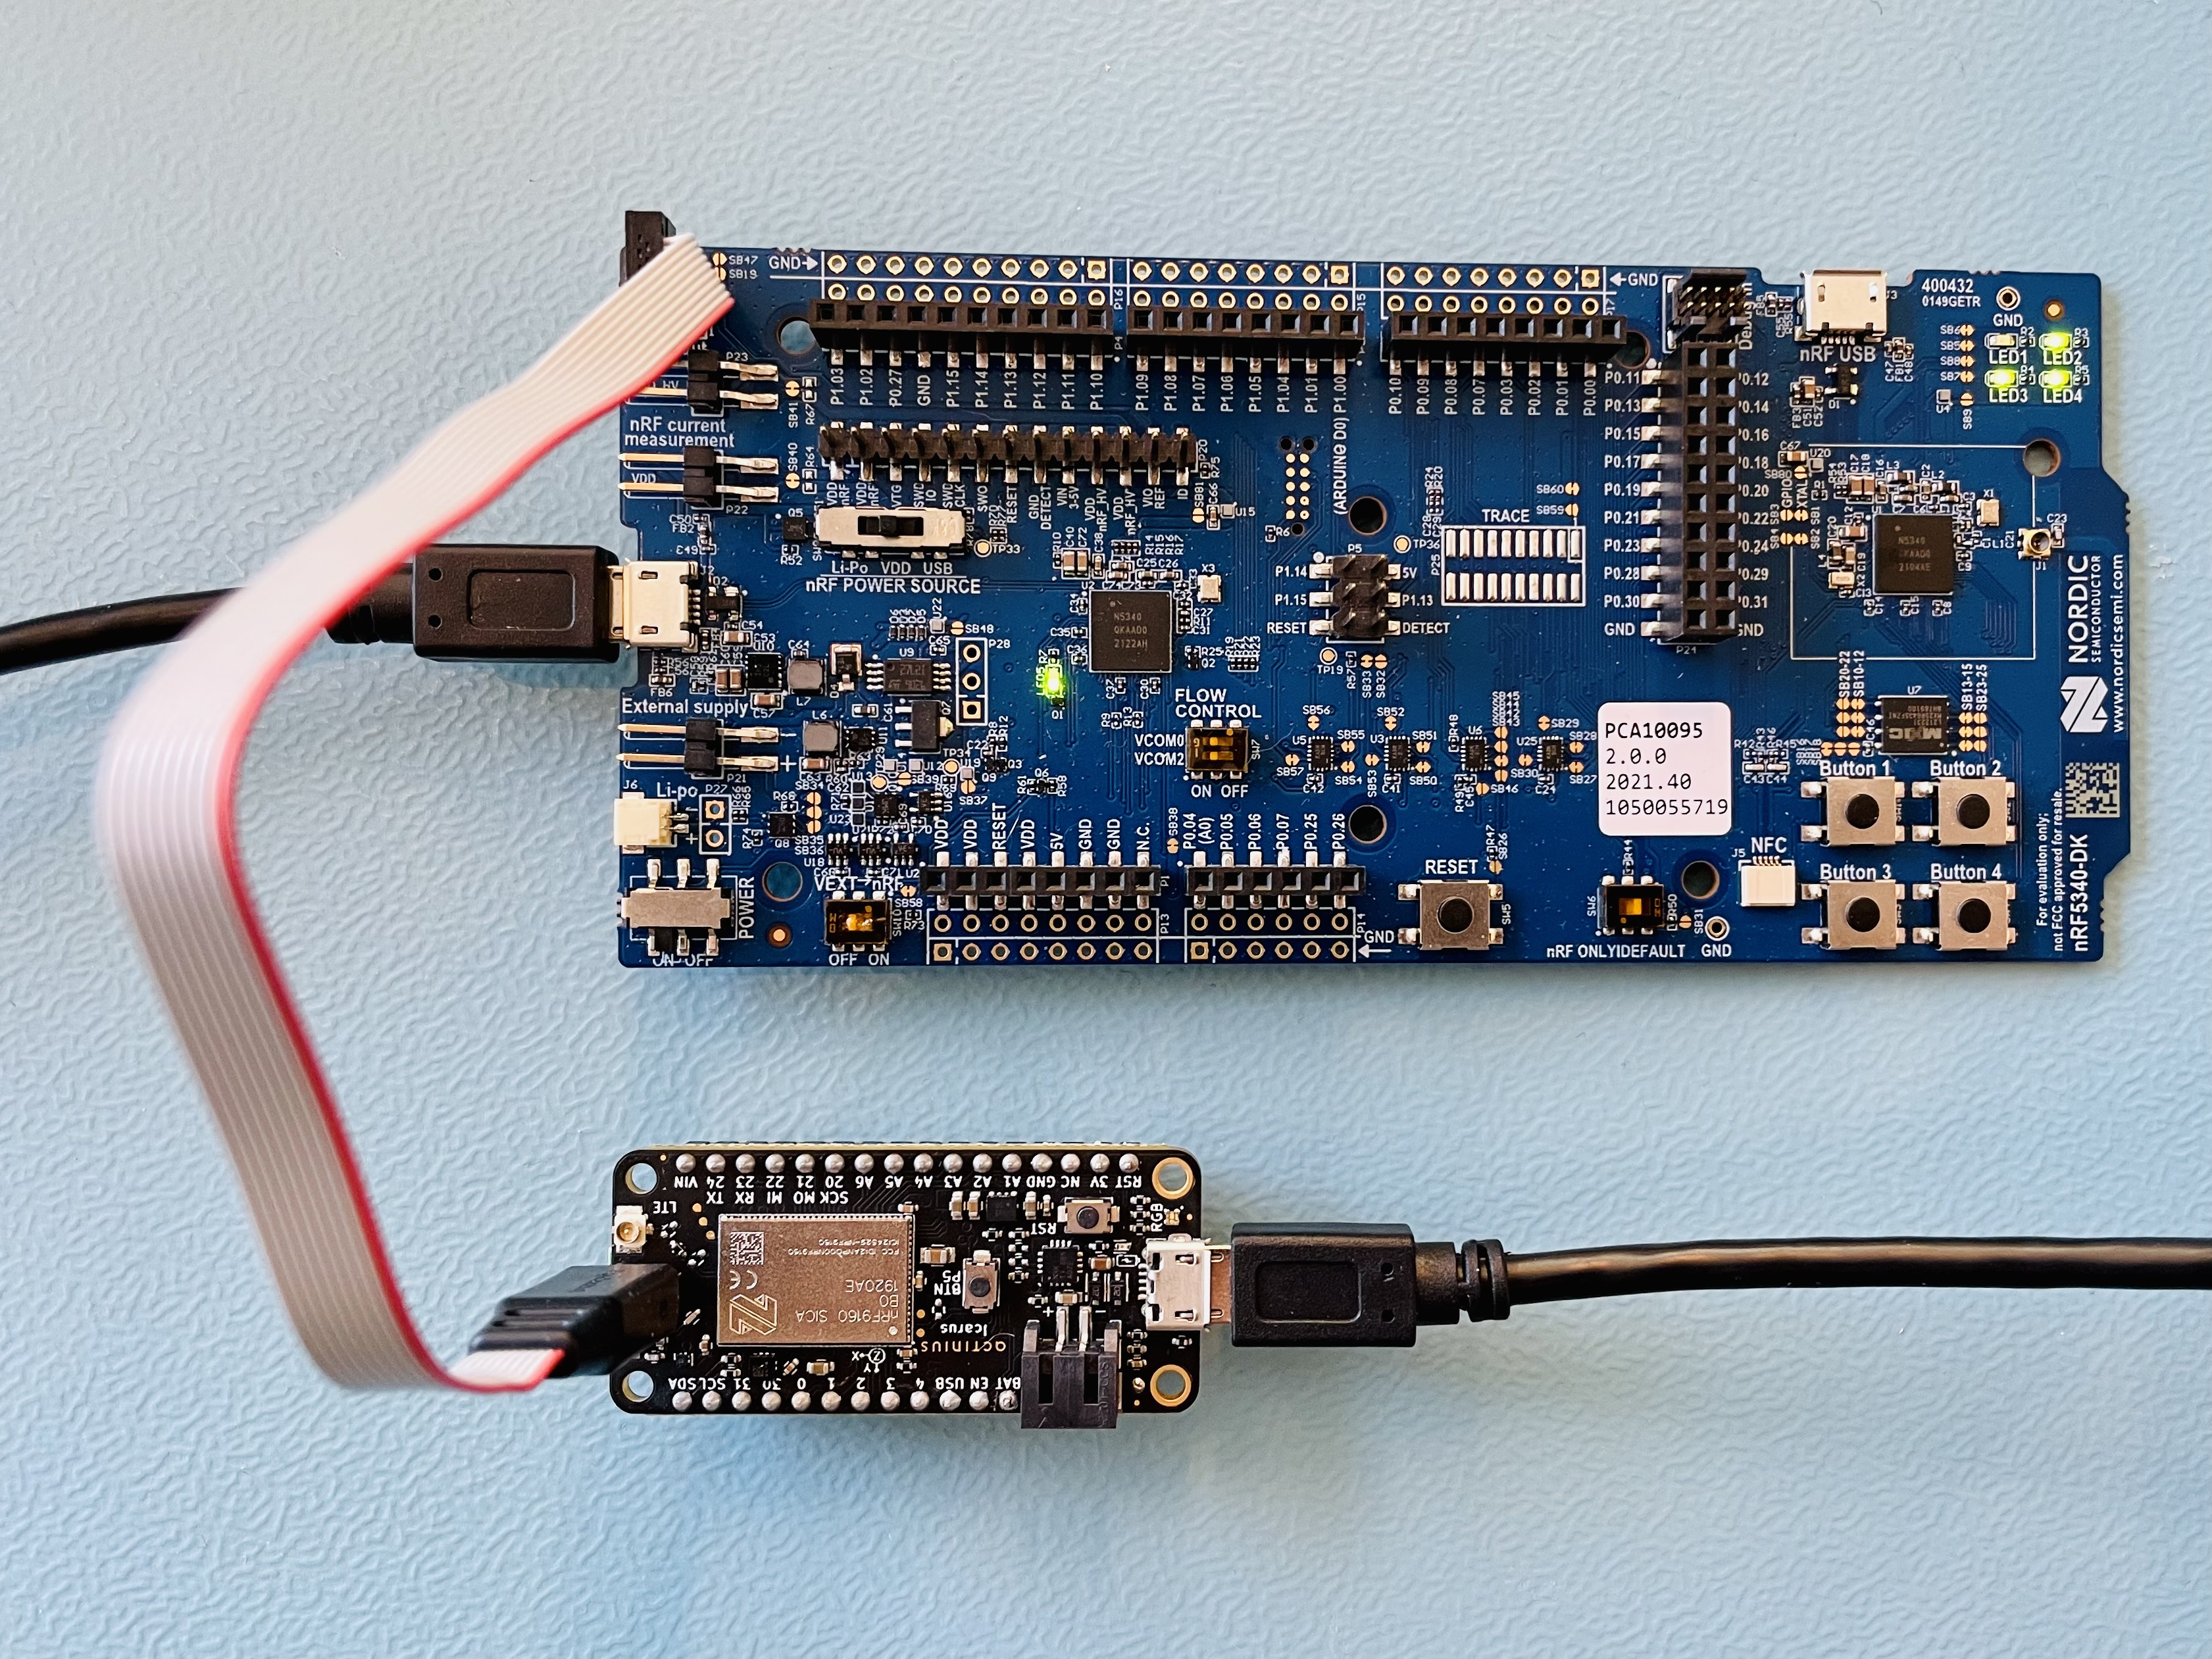
The image below shows how an Icarus IoT Board v2 and nRF5340 development kit are setup for programming. In this example, both boards are powered through the micro-USB ports.
Flashing the application through VS Code:
Flashing an application through VS Code can currently only be done through a J-Link programmer. The nRF Connect SDK extension provides dedicated buttons in the GUI of VS Code to program a board.
- Choose and download an Icarus sample application from the samples section.
- Open VS Code and click on the nRF connect icon in the left sidebar.
- Build the application if you haven't already (follow the guide on building an application for the Icarus).
- Connect the J-Link programmer to your computer. When connected, it will show up in the connected devices tab of VS Code.
- Power the Icarus by connecting it to your computer.
- Plug the TagConnect cable into the J-link programmer and press the TagConnect pins onto the programming pads of the Icarus (see the datasheet for more information about the TagConnect programming pads). If you purchased the TagConnect cable together with the Icarus, a retaining clip is included that secures the cable to the board so you don't have to hold it.
- Under the actions tab in VS Code, click on flash or erase and flash.
The Icarus will now be flashed with the new application. After programming, the board is reset automatically and the application is started. If the application provides serial output you can view it in VS Code through the nRF terminal extension:
- Click on the nRF Terminal Disconnected button in the blue toolbar at the bottom of your screen. This will prompt you to select a serial port and baudrate.
- Select your COM port.
- Set the baudrate to 115200 Bd.
Flashing the application through West:
You can flash binaries to the Icarus through West after building your application. There are multiple binaries generated during building and they can be found in the build directory under \build\zephyr\. The binary used by West contains the user application, zephyr kernel, and bootloader(s). It is available in the following formats: merged.elf, merged.bin, and merged.hex format.
- Connect the J-Link programmer to your computer. West will automatically detect the J-Link programmer.
- Power the Icarus by connecting it to your computer.
- Plug the Tagconnect cable into the J-link programmer and press the Tagconnect pins onto the programming pads of the Icarus (see the datasheet for more information about the TagConnect programming pads).
- Flash the binary onto the Icarus using the following command:
$ west flash --verify
The flash command will automatically take the required binary and flash it to the Icarus. After programming, the board is reset automatically and the application is started.
Flashing an application using MCUBoot and USB
It is possible to program the nRF9160 on the Icarus through the USB-connector without the need of a J-Link programmer by using the MCUBoot bootloader. This is a bootloader that runs from flash and enables firmware upgrades without the need of programming pins. MCUBoot requires a certain partition structure in the flash to work. These partitions have been defined in the device-tree of the Icarus:
| # | Partition | Description |
|---|---|---|
| 1 | boot_partition | Partition that stores MCUBoot itself |
| 2 | image_0_primary_partition | Primary partition slot for the user application image |
| 3 | image_0_secondary_partition | Secondary partition slot for the user application image |
| 4 | scratch_partition | The scratch slot. This partition is used for reliable image swapping when doing a firmware upgrade. |
For more information on MCUBoot and its workings, check out the MCUBoot documentation.
Out of the box, all the Icarus boards come pre-programmed with MCUBoot. To build an MCUBoot-compatible user application, the application must be built with SB_CONFIG_BOOTLOADER_MCUBOOT=y in sysbuild.conf. This will generate a signed binary named zephyr.signed.bin, with the correct memory offset for MCUBoot which can then be flashed onto the Icarus using the Actinius I/O Serial Programmer or the mcumgr utility.
Flashing the application through mcumgr and MCUBoot:
The mcumgr CLI tool is deprecated. The recommended alternative is the Actinius I/O Serial Programmer, which provides a browser-based flashing experience with no software installation required.
- Build your own application or download an Icarus sample application from the samples section. Make sure that the application is built with
SB_CONFIG_BOOTLOADER_MCUBOOT=yinsysbuild.conf. - Open a command prompt and navigate to the build directory of your application, where the
zephyr.signed.binimage is located ($ cd <path-to-sample-dir>/build/<app_name>/zephyr/) - Connect the Icarus to your computer using the USB-connector or baseboard depending on the board type.
- Press and hold the reset button. Then press the user button and release the reset button. Finally release the user button as well. This will put the Icarus in MCUBoot mode.
- Flash the image onto the Icarus using the following command:
$ mcumgr image upload zephyr.signed.bin --conntype=serial --connstring="dev=<com-port>,baud=115200"
The <com-port> on Windows can be e.g. COM4. The board will now get flashed with the zephyr.signed.bin image. Press the reset button on the Icarus to start the application.
If you get an error saying: "Error: Access is denied" it means that mcumgr cannot access the COM-port on which your Icarus is connected. Make sure to close the port of the Icarus from all serial monitors on your computer (VS Code might automatically connect the serial monitor when the Icarus is connected to your PC).
Restoring MCUBoot on your board:
It might happen that you have previously programmed an application onto your board, using a J-Link programmer, that does not contain the MCUBoot bootloader. Building your application with SB_CONFIG_BOOTLOADER_MCUBOOT=y in sysbuild.conf will include the MCUBoot bootloader. If this option is not enabled, your board will not run MCUBoot. This means you can only flash the board using a J-Link programmer and TagConnect cable.
To restore MCUBoot on your board, you can add SB_CONFIG_BOOTLOADER_MCUBOOT=y to your sysbuild.conf and rebuild the application. After building, flash your board with the new application image (merged.hex).
The applications provided in the Actinius I/O Serial Programmer use the default private key bundled with MCUBoot. If you change MCUBoot that comes pre-programmed on the board and use your own private key, you should keep using the same key to create and sign further updates otherwise MCUBoot will fail to start your update. If you wish to restore MCUBoot to the one provided by Actinius, just re-program the Asset Tracker (Factory Firmware Bundle) using a programmer.
Legacy: Different MCUBoot partition offsets (Icarus board versions < v2.0)
If you are building an application with nRF Connect SDK v1.3.x or higher and your goal is to flash app_update.bin on an Icarus that came with the Asset Tracker Application v1.x.x, then the partition offsets for MCUBoot must be changed. SDK versions v1.3.x and up use different offsets for the MCUBoot partitions that are not compatible with the offsets of MCUBoot that comes shipped with Icarus versions < v2.0.
Your generated app_signed.hex image should use the old partition offsets. The application image can be made compatible by following these steps:
-
Add the following 2 files in the project root folder where the prj.conf resides (right click and save file):
- Partition manager YAML file: pm_static.yml
- MCUBoot config overlay file: mcuboot_overlay-rsa.conf
-
Insert the following lines into CMakeLists.txt, under the line "cmake_minimum_required..."
set(PM_STATIC_YML_FILE ${CMAKE_CURRENT_SOURCE_DIR}/pm_static.yml)

list(APPEND mcuboot_OVERLAY_CONFIG "${CMAKE_CURRENT_SOURCE_DIR}/mcuboot_overlay-rsa.conf")
- Rebuild your application.
The pm_static.yml file sets all the partition offsets to the values used by the old MCUBoot version.
NOTE: The steps described above are not needed if you have flashed an application with a newer version of MCUBoot (nRF Connect SDK version > v1.3.x) onto your Icarus using a J-Link programmer.
Flashing an application using the Actinius I/O Serial Programmer
The Actinius I/O Serial Programmer is a module of Actinius I/O that can be used to flash your Icarus with pre-built applications and samples or your own custom binaries. It is compatible with Chrome, Chromium, Edge, Opera and it doesn't require any software to be installed to your computer.
Flashing the application:
- Login to Actinius I/O and click on "Serial Programmer"
- Connect your device and select the device type from the drop-down menu
- Select a pre-built application from the list or add your own
zephyr.signed.bin - Click the Write button to flash.
- Follow the instructions on the screen to put your board into MCUBoot mode.
The board will be flashed with the firmware application. Once flashing is finished, press the reset button on your board to start the application.